WordPress Optimization: Ultimate Guide for Better Performance and Speed
Last updated
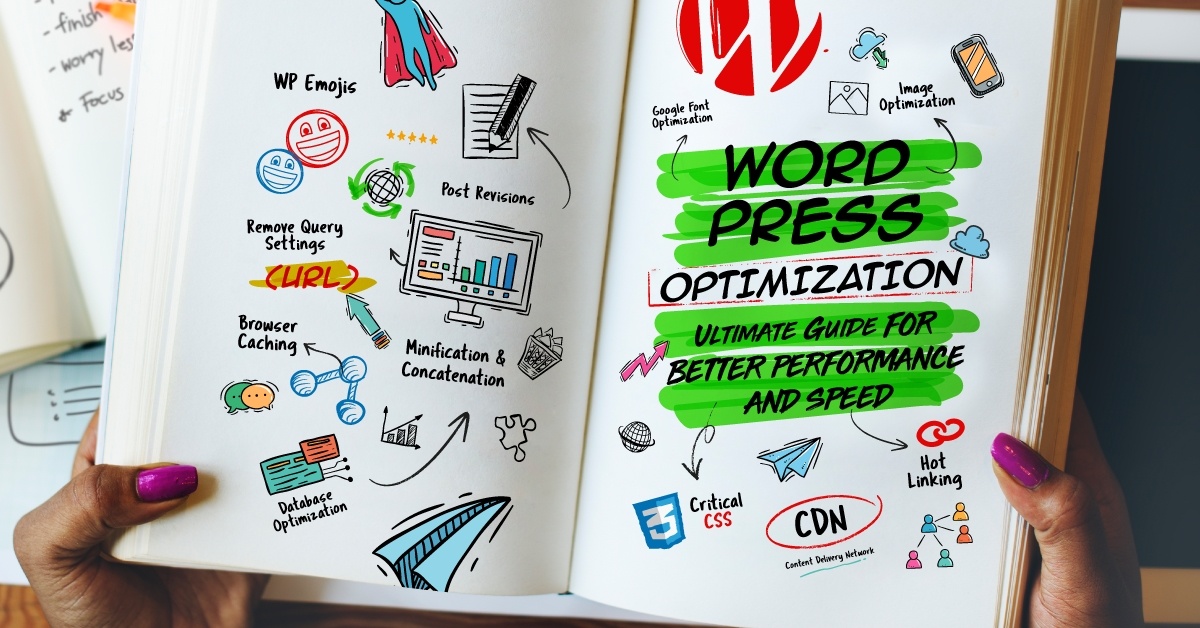
This is the largest collection of WordPress Optimization tips on the planet.
The best part?
All of the techniques in this guide are 100% actionable.
Using the strategies below our WordPress website developers consistently get page scores of 95+ and higher rankings on our projects.
So if you want to learn how to make your site load faster and rank better checkout our new step by step WordPress optimization guide

I want tips that will help with
I want tips that are:
Image Optimization
What is image optimization?
Images on a website often account for most of the data downloaded on a web page. They also occupy a significant amount of visual space; pictures can help make or break a great looking website. When looking at how to optimize a website for performance, optimizing images can often yield some of the largest data and space savings which means a faster loading, better performing website: the less information the browser has to download, the less competition there is for the website owner’s bandwidth and the faster the website can be loaded up for the visitor.
Image optimization is part art and part science. The art of image optimization comes from the process of compressing an image since there is no standard, and a science because there are many well developed techniques and algorithms that can significantly reduce the size of an image. Click here to see what we most commonly use ourselves . Finding the best way to optimize your website’s images requires careful analysis and a lot of considerations: format capabilities, content of encoded data, quality, pixel dimensions, and more.
Why does image optimization matter for your WordPress website?
Large images are one of the main causes of slow, below average website loading times. 73% of mobile internet users report that they’ve experienced problems with page load times on their devices. When you have large images on your website, your visitors have to endure long loading times before they can consume and engage with your content. The time that it takes for the large images to load on a poorly performing site maybe enough of a delay that your website visitor may leave and move onto the competition.
How do you optimize images for your WordPress website?
There are multiple ways to optimize an image based on your expertise level and personal preference. We’ve provided all the details for each strategy below. Learn about them, implement them and see what techniques for image optimization work best in your own internal process.
Image Dimensions
Image dimensions are very important to consider when talking about image optimization. Let’s suppose you have an area on website which accepts an image 200×200 pixels image but you uploaded a images higher in resolution, let’s say 300×300 pixels. In this case, there is a 100×100 pixels extra information which your website visitor will have to download in order to see the image correctly. On top of that the website will have to resize the 300×300 image to fit 200×200. Now, consider this with several images in the same scenario; this will directly increase the load time for your website. Google published an article on this process and why it’s important to consider when optimizing your website for speed. Check out Google Developers to get more information here.
Solution:
Crop the images to the correct dimension or as close as possible to eliminate or reduce the dynamic image size adjustments that need to be made. There are various free and paid tools available which you can use to crop images. The most common are Paint for Windows, Preview for Mac and GIMP for Linux. You can also use something like Adobe Photoshop, Sketch, and others.
Image File Size
Any picture, whether taken from an iPhone or a professional camera, in the raw format should never be uploaded directly on the website. The original image will always be large in size, even on smartphones, and the image file usually contains extra information that you don’t need for your website. There are different ways to remove the unnecessary metadata from the images as described below. Once you get the right dimensions for your image and reduce the size of the image itself, you can further reduce the size by removing all of the unnecessary information, or metadata, that is embedded into the image. This process of reducing the image size is two-fold:
1. You need to reduce the size of the image
2. You need to remove the unnecessary, and unseen metadata attached to the image file. Here is how you can do that:
Reducing the image size for page performance:
- Use software like Adobe Photoshop and ImageOptim will help you reduce image sizes quickly and easily. Below are some screenshots and a step by step process to reduce image sizes using Adobe Photoshop;
- Online tools can also be used to optimize images by reducing their size and quality. The most common tools are Kraken.io and TinyPng. You can find tons of other online compression tools both free and paid, and they usually work about the same. Some applications might have restrictions on the maximum upload size or limits to how much you can reduce the image by, so choose the solution that makes the most sense for you.
- You can also use WordPress image optimization plugins if your website is built on the WordPress platforms. We have used and seen a ton of different WordPress plugins, and they all get the job done, just in a slightly different way. Here are some of our favorite WordPress image optimization plugins; WP Smush It, EWWW Image Optimizer, Imsanity, Kraken.io, Optimus. Each of these plugins can be setup to provide automatic image optimization when images are added to the website. This is a streamlined and much more efficient process than manually optimizing images.
Database Optimization
What is WordPress database optimization?
Database optimization is the process of reducing the database system response time so that your website loads faster. As you can imagine, databases can store tremendous amounts of information, useful and not. Specific bits of information are often accessed by queries (or automated search terms) written in a particular interface language, such as SQL. What this simply means is that data in your database is retrieved by actions that access it. Database optimization involves maximizing the speed and efficiency with which data is retrieved.
Why does optimizing your WordPress database matter to your website?
WordPress is powered by PHP and MySQL and for every WordPress installation there’s a MySQL database behind it. Your MySQL database contains all the information about your WordPress website, Your MySQL database organizes all that information into separate tables. There’s a table for your options and settings, a table for your comments, a table for your post content, etc. All the data you enter on the back end and more like your blog title, page and post content, comments, are stored in those tables in your database. This information is efficiently stored and managed like a closet that is perfectly organized with drawers, hangers and cupboards for all of your clothing.
If you’ve ever changed themes, uninstalled plugins, deleted a blog post, etc. there is a chance that information got left behind in your database, taking up space and impacting the query and database performance. When your database contains a lot of old information you don’t need anymore, like every single revision or draft version of your posts, it can lead to serious performance issues leading to slower execution of queries and displaying of data on the front end of the website.
As your WordPress website grows and ages, it accumulates more records leading to more space and memory utilization. All that information in your database is not only taking up valuable space but will end up slowing down your website as it takes longer for your server to find and retrieve the data it needs. Imagine that perfectly organized closet, now just a mess! The shirts and pants are mixed up, the colors aren’t coordinated, and nothing is where it should be and is now chaotic vs. efficiently organized.
When you clean up and optimize your WordPress database you can shave valuable seconds off your site loading time and get your messaging and website in front of your customer faster. Now that you know why it’s important to clean up your WordPress database, we’ll show you how exactly to do it.
How to optimize WordPress database?
There are several ways to optimize the WordPress database, and many of them are effective, but to keep things simple we will cover the most common ones that we use.
1. PhpMyAdmin
PhpMyAdmin is the most common way to manage a WordPress database. If you are not using cPanel as your hosting control panel, your hosting plan may be using a different MySQL management tool vs. PhpMyAdmin. Since most database management tools have a similar interface and work in the same way, we will cover how to use PhpMyAdmin to optimize your WordPress database.
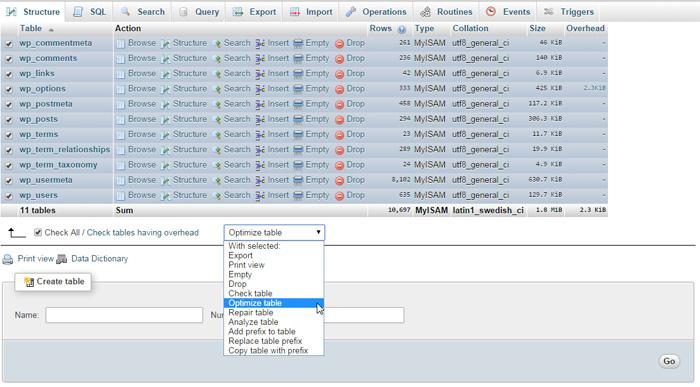
If you check your database, you will see two columns at the end: size and overhead. The size of a table depends on the amount of data that is stored in it. If more rows are stored in a table, the size of the table increases.
Overhead is temporary disk space that is used by your database to store queries. Over time, a table’s overhead will increase. It is perfectly normal to have overhead in your WordPress database and it should not affect performance unless the overhead gets high.
You can optimize tables that are affected by overhead by using the SQL command OPTIMIZE TABLE. For example, you could optimize the wp_posts table by executing this SQL query:
OPTIMIZE TABLE ‘{WordPress Prefix}posts’
Alternatively, you can use the PhpMyAdmin’s built in functionality to optimize tables from the main drop down menu. All you need to do to optimize your database is…
- Click on the “Check All” box
- Select “Optimize table” from the dropdown menu
- And then click on the “Go” button.
2. Plugins
There are various WordPress plugin available which you can be used to clean up and optimize your WordPress website’s database. These are the ones we recommend for intermediate or beginner WordPress users.
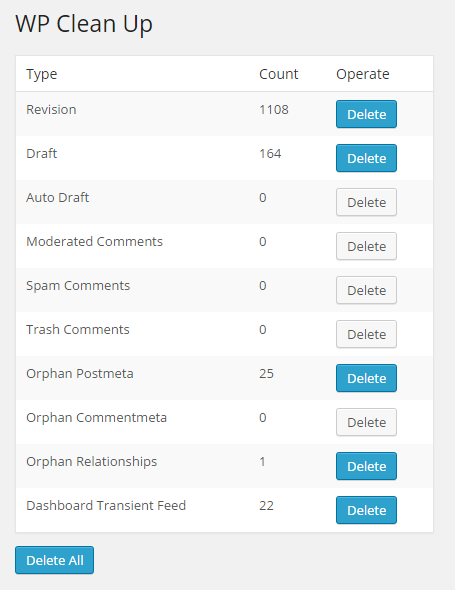
WP Clean Up is a great way of quickly removing unwanted data with few clicks. Using the plugin you can see exactly how many bits of data are being stored and clean up the areas that are not needed. This is great because it gives you a quick overview and a very simple way to remove the unnecessary data and start optimizing your database.
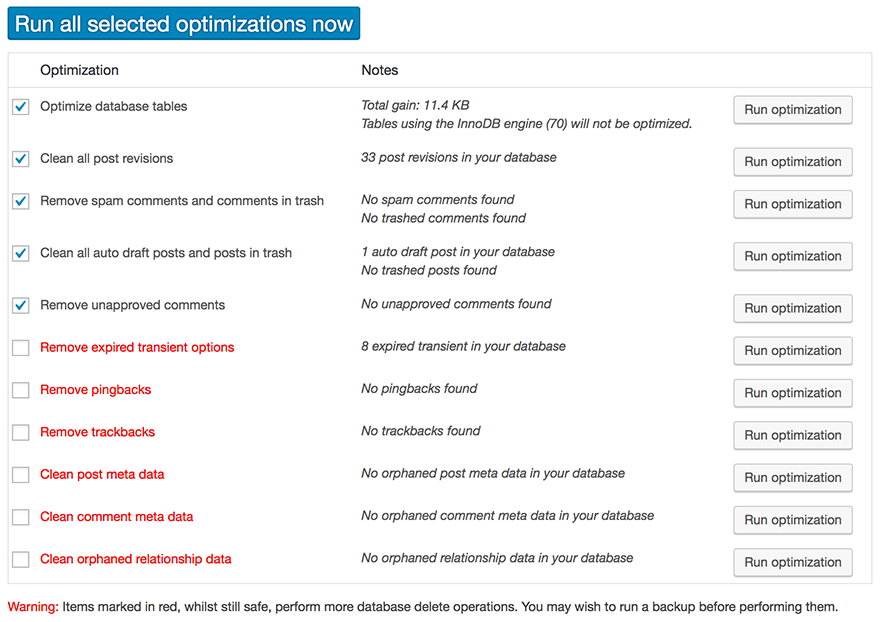
WP Optimize can be used to remove post revisions, drafts, spam comments, unapproved comments, comments in the trash, transient options, pingbacks and trackbacks. It also includes a page that shows the data size, index size, and overhead, of each database table. This is another great tool that lets you quickly and easily see what you should and can remove in a few seconds and has little to no learning curve needed for using it.
Minification and Concatenation
What is minification?
Minification is a process of stripping all the unnecessary data from a file that isn’t required in order for the files functionality to be executed. One simple example is the comments or the white spaces in a file as neither are required for a file to be loaded. Minification is performed after the code for a web application is written, but before the application is deployed. When a user requests a webpage, the minified version is sent instead of the full version, resulting in faster response times and lower bandwidth usage.
What is concatenation?
Concatenation is the process of putting similar file types or resources (CSS and JS) into one file to reduce the amount of HTTP calls to the web server. The more calls made to the web server in turn results in slower page load times.
Why minification and concatenation is necessary for your WordPress website?
The majority of WordPress websites use different themes and plugins and almost all of themes and plugins contain various CSS, HTML and JS files. The more CSS and JS files that are being used, the more HTTP calls will be made on the server in order to render a particular website. In this process the file size plays an important role in the website load time. The larger the file size, the slower the website will load.
When minification is performed, practically all of the comments and whitespace is removed from the CSS, JS and HTML files, which in turn reduces the file size resulting in faster page load times.
In a similar way the concatenation helps in reducing the HTTP calls since it is combining multiple CSS files into one CSS file and multiple JS files into one JS file. When a call is made it is only to a single document, or less documents, which means the call can be completed much faster.
How to minify the CSS, JS and HTML on your WordPress website?
Minification can be performed manually or by utilizing one of the plugins available in the WordPress plugins repository. Out of all the plugins available for optimization, we prefer to use the Autoptimize plugin offered by Frank Goossens. This plugin is actively used by over 200,000+ websites at the time of writing this article. The icing on the cake is that the installation and configuration is very simple and intuitive. Follow our steps below to install and configure the plugin for your WordPress website to help it load faster.
Autoptimize – Installation
- Log in to your WordPress dashboard
- Visit Plugins -> Add New
- Search for Autoptimize
- Install and activate
Autoptimize – Configuration
- Visit Settings -> Autoptimize
- Click on the Show Advanced Settings button on the top right (if not done yet)

- HTML Options: Check the checkbox for ‘Optimize HTML Code?’ and leave the other checkbox unchecked.

- JavaScript Options: Check the checkbox Optimize JavaScript Code. You can leave the other options as it is.
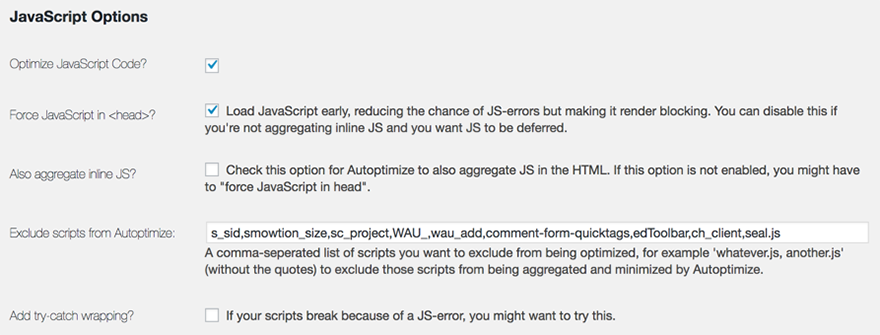
Note: If for some reason, enabling this option breaks the website, you can try checking the last checkbox “Add try-catch wrapping?”. In most cases, this will resolve the problem and you should be good to go. - CSS Options:
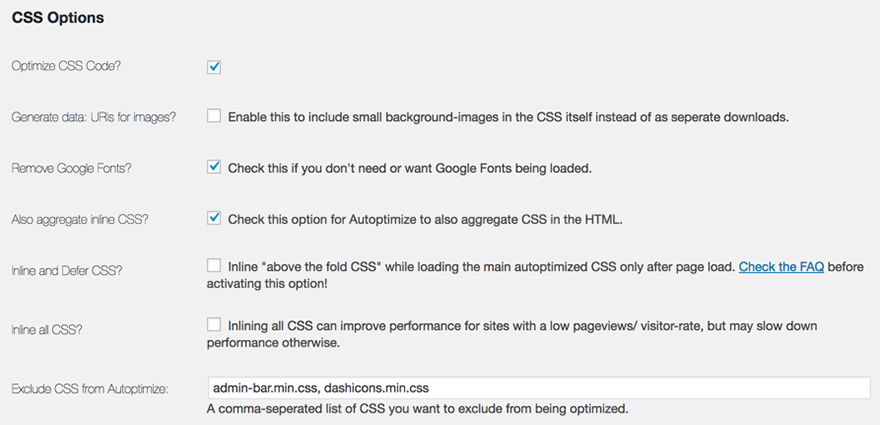
- Check the checkbox “Optimize CSS Code”
- Check the checkbox to remove the Google fonts (In order to do this, you have to make sure to download the Google fonts, generate the web fonts and add on your website. Otherwise, you should keep this checkbox unchecked or it could break the fonts on the website)
- One great option is to move all the inline styles into a CSS file. This can be done checking the checkbox “Also aggregate inline CSS”. Note: In some cases, this option can break the design. If that happens, keep this checkbox unchecked.
- Lastly, if there is any specific CSS file which you do not want to be combined, you can add the name of that file in the textbox “Exclude CSS from Autoptimize”. Make sure to keep the different file names separated by a comma.
- Cache Options: Check the checkbox for saving the compressed version of CSS and JS files in the cache and served statically and click on “Save Changes and Empty Cache”.
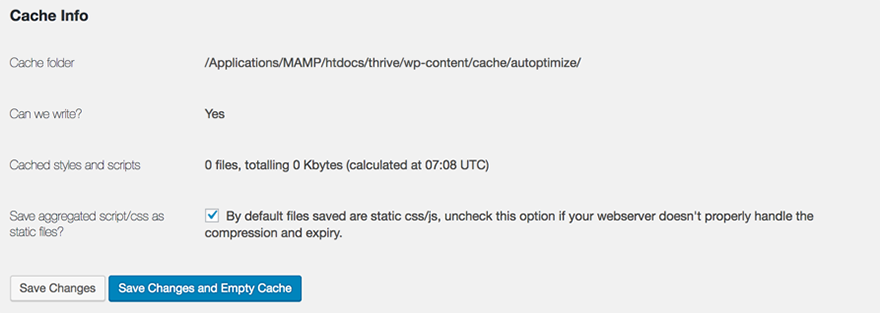
Note: As the note says, if for some reason saving the CSS and JS files statically does not work on your server, you should uncheck the checkbox and save the changes.
Critical CSS
What is Critical CSS?
There is concept of Above the Fold in web design which is term to describe the part of the website which is first visible to the user on the page load before any scrolling happens. As you know CSS is needed for each element on the website to look nice and this is the first part of the website which will show up.
This is where Critical CSS comes into play. Critical CSS is a method we use to;
- To generate the CSS for the content visible above the fold
- Include that CSS code inline on the page load
- Load the actual CSS file after all the other elements and resources are loaded
Why is there a need to generate the Critical CSS and enable on your WordPress website?
As most of you already know, at times WordPress can be slow based on the theme and number of plugins used. In the earlier sections where we covered Minification and Concatenation, we discussed about how to combine the multiple CSS files into one single file to reduce the number of HTTP calls to speed up the website. If you combine several files into a single file, this may lead in one single file heavy in size (we have seen the CSS file being several times bigger after concatenation on few of our clients websites) In this case it means until that one single CSS file is loaded, no other elements on the website below that CSS file will load.
This could become a problem if your file is too large and this is where Critical CSS comes in play. Critical CSS is only generated for the above the fold content. What this means is that the CSS code file will be much smaller when compared to the complete CSS file, which after combining several lines of code, could be very large. The reason this is very crucial to consider is once again the speed load time for the above the fold content. If you are concerned about your WordPress website’s page speed, using Critical CSS to laser focus on fast loading above the fold content is a necessity.
How do you make the Critical CSS work on your WordPress website?
Working with Critical CSS is a several part process. The first part is to generate the Critical CSS for the above the fold content. Here are the steps that we follow to achieve this process;
- In the Minification and Concatenation section, we discussed how to combine multiple CSS files into one. Once you are done combining the files, view the source CSS file of your website homepage. You will see a CSS file generated via Autoptimize which will something like this http://domain.com/wp-content/cache/autoptimize/css/autoptimize_{hash_string}.css. Save the file on your desktop computer and open it in the Notepad or any other basic text editor you have.
- Next you will visit https://jonassebastianohlsson.com/criticalpathcssgenerator/
- Enter your homepage URL you found in the CSS file in Step 1
- Copy all the CSS code from the editor and paste it into the textarea in Step 2
- Click Create Critical Path CSS
- Copy the code generated and save it onto your desktop computer somewhere safe
Once you have generated the Critical CSS file you need to move to final step to configure the Critical CSS on your WordPress website. Follow our instructions below to implement it onto your website;
- Log in to your WordPress admin
- Navigate to Settings -> Autoptimize (considering it was enabled already as explained earlier)
- Enable the option “Inline and Defer CSS?” and then paste the generated CSS code in the below textarea. See the screenshot below

- Click Save Changes and Empty Cache
Browser Caching
What is browser caching?
The browser cache is a temporary storage location on your computer for files downloaded by your browser (Internet Explorer, Google Chrome, Firefox, etc). These downloaded files are used to display websites faster vs. loading them from the website each time they are needed by the browser. Files that are cached locally typically include any documents that make up a website, such as html files, CSS style sheets, JavaScript scripts, as well as images and other multimedia content.
Why should you enable browser caching on your WordPress website?
When you revisit a website, the browser checks what content was updated since your last visit and only downloads the newer files that were updated since the last visit or whatever is not already stored in the cache. This helps reduce bandwidth usage on both the user and server side and allows the page and website to load faster. This cache is especially useful when you have a slow or limited Internet connection.
How do you enable the browser caching on your WordPress website?
There are multiple ways to leverage browser caching to speed up your WordPress website. The step by step guide we have below, is the best way we have found to implement browser caching on WordPress websites. Be sure to pick the correct code based on the server your WordPress website is running on.
Note: Basic code editing knowledge required because the code will need to be added to the .htaccess file in the root of your WordPress install.
Apache
# Cache Control
<filesMatch ".(ico|pdf|flv|jpg|jpeg|png|gif|js|css|swf)$">
Header set Cache-Control "max-age=84600, public"
</filesMatch>
# Expire Header
<IfModule mod_expires.c>
ExpiresActive On
ExpiresByType image/jpg "access 1 year"
ExpiresByType image/jpeg "access 1 year"
ExpiresByType image/gif "access 1 year"
ExpiresByType image/png "access 1 year"
ExpiresByType text/css "access 1 month"
ExpiresByType application/pdf "access 1 month"
ExpiresByType application/javascript "access 1 month"
ExpiresByType application/x-javascript "access 1 month"
ExpiresByType application/x-shockwave-flash "access 1 month"
ExpiresByType image/x-icon "access 1 year"
ExpiresDefault "access 2 days"
</IfModule>
Resources
- Free
- W3 Total Cache https://wordpress.org/plugins/w3-total-cache
- WP Super Cache https://wordpress.org/plugins/wp-super-cache
- Paid
- WP Rocket https://wp-rocket.me
- WP Hummingbird https://premium.wpmudev.org/project/wp-hummingbird
Server Caching
What is server side caching?
WordPress caching is one of the fastest ways to improve site performance and one of the easiest ways to make your WordPress website run faster. If you’re not familiar with server-side caching in WordPress, there are four different kinds of caching: page caching, database caching, object caching, and opcode caching. To become more familiar with these types of caching, see the explanations and details for each type of server side caching below.
Page Caching
Page caching refers to the process of saving the dynamically generated HTML files in the server’s hard disk and serving them from the cache whenever a request is made. This saves the overhead of executing PHP code and MySQL database queries.
Database Caching
WordPress heavily relies on its database and it makes a query every now and then. Making queries to retrieve the same data multiple times is a resource intensive task. Therefore when you are able to save the results of a query in local storage vs. continually executing it improves your site performance especially on dynamic WordPress sites powered by lots of database queries. When database queries results are saved in local storage it is called database caching and this is one of the core factors in implementing WordPress caching.
Object Caching
Object caching is the process of making data that is cached during one request available during subsequent requests. WordPress has had a caching system baked into it and by default WordPress includes an internal caching system. If you use get_option( ‘something’ ); somewhere in your site, then run that same code later on in that page, WordPress will only need to load the data from the database once, as it caches it for use later on in the page load. It does this via the wp_cache_add(), wp_cache_set() and wp_cache_get() functions.
Opcode Caching
Opcode caching is the process where compiled PHP code is saved between every request. WordPress at its core uses PHP (an object-oriented programming language) meaning that in order for a PHP code to be executed, a PHP compiler must compile the code first and generate the executable code. That code will then be executed by the web server. In other words, opcode caching is storing the output of the PHP compiler in the cache.
Why should you enable server side caching on your WordPress website?
When a user visits on your WordPress website, WordPress utilizes the cached data so it can save the MySQL round trips to speed up the page load time. In the same way the page caching generates the HTML version of the pages and serves them to the user instead of processing all the dynamic PHP code over and over again. We recommended enabling the server caching on your WordPress website because it will help speed up performance and shorten page load time.
How to enable the server caching on your WordPress website?
There are various free and paid plugins available which you can easily install and configure in few clicks. Here are some of the most used (and best) options.
W3 Total Cache (Link)
WP Super Cache (Link)
WP Rocket (Link)
WP Hummingbird (Link)
Remove Query Strings
What is a query string?
As it is defined on the Wikipedia, a query string is the part of a uniform resource locator (URL) containing data that does not fit conveniently into a hierarchical path structure. The query string commonly includes fields added to a base URL by a Web browser or other client application. You have seen these before and might have noticed them on your own website. See the example below;
http://www.domain.com/?ver=1
Why should you care about removing the query strings from your WordPress website?
If you ever test your website on tools such as Gtmetrix, Pingdom, or Google’s PageSpeed Insights you may have come across the suggestion to remove the query strings from the static resources. The reason it’s recommended to remove the query strings is because the static resources should be cached more effectively. The correct way to cache static resources is by the proxy caching server which yields better performance and reduces the page load time. Therefore, it is always recommended not to have the query strings added to the static resources, specially CSS and JS files.
How to remove the query strings from your WordPress website?
There are two ways to remove the query strings from the static resources to optimize your WordPress website’s load time. We have outlined both ways in detail below;
1. Removing query strings via code
If you are a familiar with adding/updating code in functions.php which resides in your theme, you can go ahead and copy the chunk of code below and add it to the end before the closing PHP tag (if available).
/**
* Remove the query strings from the static resources
*/
function _remove_script_version( $src ){
	$parts = explode( '?ver', $src );
	return $parts[0];
}
add_filter( 'script_loader_src', '_remove_script_version', 15, 1 );
add_filter( 'style_loader_src', '_remove_script_version', 15, 1 );
2. Remove the query strings using a WordPress plugin
There are different plugins available that can help in removing the query strings from static resources. The one that we recommend and have tried and tested rigorously is Remove Query Strings From Static Resources. This plugin is super simple to install and configure and also it is being utilized actively over 70,000+ websites which means better support and more updates.
Steps to install the plugin
- Visit WP-Admin -> Plugins -> Add New
- Search “Remove Query Strings From Static Resources”
- Install and Activate
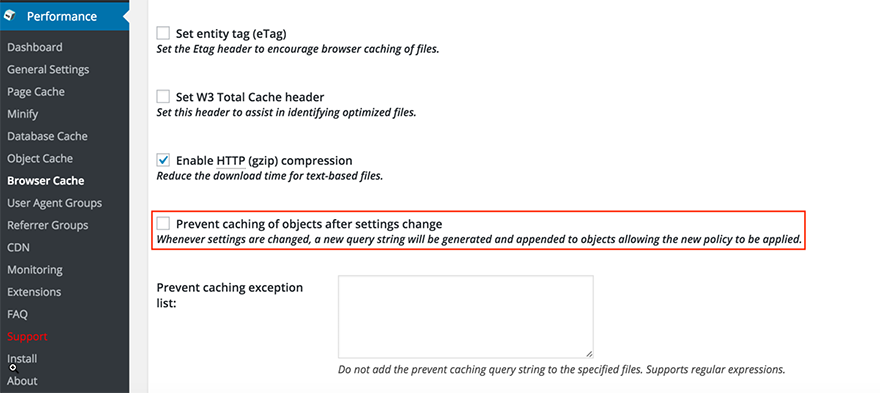
Note: If you are using W3 Total Cache plugin, you don’t need to install the query string remover plugin or add any code in functions.php file. W3 Total Cache plugin provides an option to remove the query strings which you can utilize to get rid of the query strings from the static resources. See the screenshot example below;
Google Font Optimization
What is Google font optimization?
Google fonts are the most commonly used fonts on the web nowadays. Every Google font contains different styles (normal, bold, italics, semi-bold etc) and while it might be good to have, is oftentimes not necessary and also not recommended to include on your website. Generally you want to pick the font styles which we plan to use on the website and nothing else. If there are no bold options for a font on your website, there is no reason to load the bold version file for example. The more font styles added on a website, the more time it will take to load the font which will result in slower page load times. The selection of the necessary font styles referred as Google Font Optimization.
Why do you optimize the Google font for your WordPress website?
As we previously covered, in the end what matters is the speed and performance of the website. Study shows that if a website loads slow, the chances of the user leaving the website increases tremendously which can impact various aspects of the business. All of the elements on the website need to be optimized in order to increase the performance and Google fonts are no exception.
How do you optimize the Google fonts?
All Google Fonts are compressed and delivered over Google’s CDN which will is already the fastest delivery possible, so when selecting Google Fonts avoid choosing all of the available styles and character sets. Identify what styles and character sets you will actually need on your website and only add those specific styles and character sets.
Selecting the variation of italic and bold fonts is not necessary in each case and many times a browser’s font-weight and font-style properties can be used as a substitute to get the same effect. If for some reason, the default browser properties do not work, then you can opt to include that particular style from Google fonts.
Many websites use unique headings and subheadings which leads to more fonts being used site wide, increasing the HTTP web server calls to load the different fonts. As you predicted, this increases the page load time. When you limit the use of multiple fonts on the same web page and keep it consistent on all of the pages across the website you can avoid this and keep things running smoothly and quickly.
Note: Read about the use of self-hosted font instead of using the font from the external server (Google or TypeKit) in the CSS minification section defined here.
Hotlinking
What is hotlinking?
Bandwidth refers to the amount of data transferred from a web site to a user’s computer. When you view a web page, you are using that site’s bandwidth to display the files that makeup the design and look of the website. Since web hosts charge based on the amount of data transferred, bandwidth is sometimes an issue, especially if they have a lot of website traffic. If a site is over its monthly bandwidth, it’s billed for the extra data or in some cases taken offline.
Hotlinking is the direct linking to a web site’s files (images, video, etc.). An example would be using an <img> tag to display a JPEG image you found on someone else’s web page so it will appear on your own site.
Why should you care about the hotlinking on your WordPress website?
As explained above, anyone can use your website resources by directly linking the image or videos from your website to theirs. When someone hotlinks they are using your bandwidth and you may end up paying more for your hosting (if you are on limited plan) or your website will be suspended until the plan renews. Preventing this from happening means preventing hotlinking from taking place on your website.
How to prevent hotlinking?
Below we have provided the best steps for preventing hotlinking. The first step is to add the code provided in your .htaccess file to disable image hotlinking on your WordPress website. This code will allow the search engines to access all the files but if anyone else tries to hotlink the image resource, they will see the nohotlink.jpg or whatever you name give to your custom file which should be displayed.
- Connect to FTP and download the .htaccess file which you will find in the root of your WordPress install
- Add a rule on the top if not available “RewriteEngine On”
- Add the below code right after the code added above
 RewriteCond %{HTTP_REFERER} !^http://(.+.)?yourdomain.com/ [NC]
 RewriteCond %{HTTP_REFERER} !^$
 RewriteCond %{HTTP_REFERER} !google. [NC]
 RewriteCond %{HTTP_REFERER} !search?q=cache [NC]
 RewriteCond %{HTTP_REFERER} !msn. [NC]
 RewriteCond %{HTTP_REFERER} !yahoo. [NC]
 RewriteRule .*.(jpe?g|gif|bmp|png|jpg)$ /wp-content/uploads/nohotlink.jpg [L]
Limiting Post Revisions
What are post revisions?
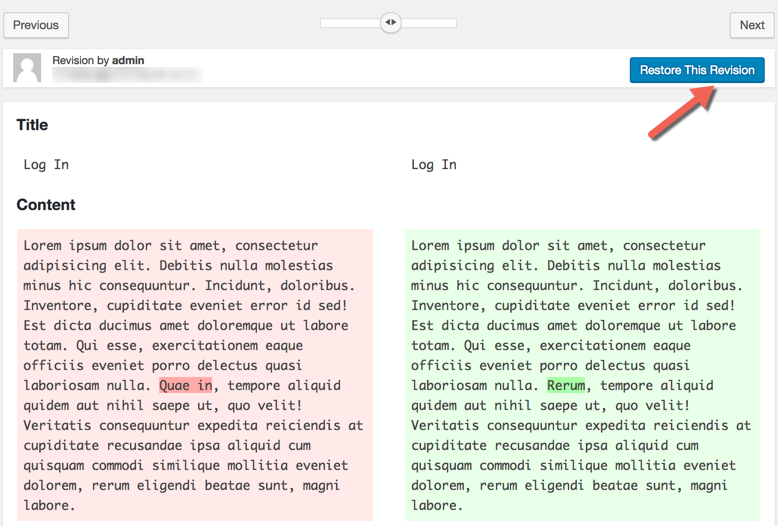
A post revision in WordPress is an internal WordPress process which tracks updates for both the default post types and the custom post types. This allows a user to rollback to previous change quickly without having to manually make the change. Revisions also allows us to compare two different versions and highlights the changes for easy identification. Read more about the revisions using WordPress here.
Why should you enable the revisions on your WordPress website?
Enabling revisions on WordPress can be really helpful and often times it has saved us a lot of trouble. Some of the main benefits of WordPress revisions we have listed below;
- If the browser crashes or something similar happens, you can restore the autosaved version of your post, reducing the chances of losing all the content.
- If you write a lot and you regret deleting a sentence or some paragraphs of text and you want to add it back, then revisions are for you. Revisions enable to look back in history of the article and get the content you deleted back easily.
- Revision allows to compare two draft and highlights the changes in the diff tool to easily identify the changes which were made after the last revision.
How do you enable and control the revisions on your WordPress website?
- First thing you have to do is add the line of text in your wp-config.php file to enable and limit the post revisions. Remember, limiting the post revisions is very crucial, otherwise your MySQL database will keep increasing in size, resulting in slow MySQL performance. Our recommendation is to keep 3 revisions or more, suitable as per your needs.
define( ‘WP_POST_REVISIONS’, 3 );
Note: Once the limit of the post revisions is reached, the oldest revision will automatically deleted. - Define the auto save internal to limit the Ajax requests which are needed to store the post revisions by adding the below link in the wp-config.php file.
define(‘AUTOSAVE_INTERVAL’, 300 ); - Enable the post revisions box in the post edit pages

This will enable the post revision box below and it looks like this

- Click on any of the link under the Revisions and you should be able to view the difference between the 2 revisions. Click on the “Restore This Revision” button to restore any particular revision.
Lazy Load Images
What is image lazy loading?
Lazy Load is a technique used to delay the loading of the images on the website. Images added outside of the browser viewport are not loaded until the user scrolls to them. This is the direct opposite of image preloading, but can be helpful in making your website load faster.
Why should you enabling the image lazy loading on your WordPress website?
Lazy load lets you serve up an image heavy website without having to suffer with all the pre fetching and loading of images that may never be seen by the user. Using Lazy Load on long web pages will make the page load faster. In some cases it can also help to reduce server load, which will again make the website load faster.
This feature will help your visitor view above the fold content on your website quickly and this feature will also aid you, saving your website bandwidth.
How do you enable the image lazy load on your WordPress website?
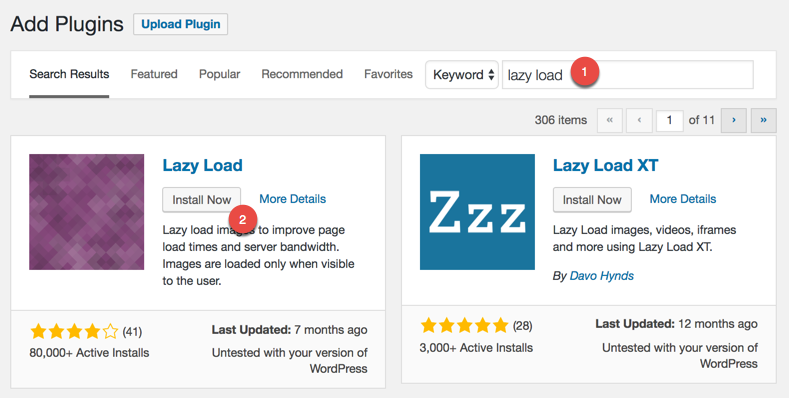
The easiest way to enable the feature on a WordPress website is to install and activate the plugin.
Using a WordPress plugin
Visit the Add Plugins screen in WordPress admin and search for ‘Lazy Load’. Install and activate the plugin as shown in the screenshot below.
CSS Image Sprites
What is a CSS image sprite?
CSS Sprites are a means of combining multiple images into one single image which aids in reducing multiple HTTP calls to web server which in turn improves the performance and reduces the page load time.
Why should you generate CSS image sprite for you WordPress website?
Like every other CMS, we can install multiple plugins and most of the plugins in the marketplace, while similar in code standards, come with a different set of CSS, JS and images. In the optimization section we reviewed how we can combine multiple CSS files into one CSS file, and similarly for the JS, but what about the images?
Each individual image file requires an individual HTTP call which directly affects the WordPress website performance and page load. Most of the time we can’t control the images added by the plugins but at the very least we can control the images which we have added in our website’s theme. For example, let’s say we are using custom icons on the website and we have somewhere around 15 icons. This simply means, when a user tries to visit our website, they have to wait until 15 unique HTTP calls are done for the images. Sounds unproductive right? There is a way to reduce the HTTP calls from 15 to 1 by combining those icons and utilizing them with the help of CSS positioning. This technique is called the image sprite technique and it is why we strongly recommend using image sprites instead of individual images.
How to use the CSS image sprites on your WordPress website?
First and foremost you have to combine all images into a one single image file. In order to do this you can use any basic image manipulation tools available. The most common we have used and seen used are Paint for Windows, Paintbrush for Mac and GIMP for Linux. You can also use something like Adobe Photoshop, Sketch, and others. See the example of a sprite below.
![]()
Next, you need to make sure that a common class in added into your HTML elements to associate the sprite as a background image and also a unique class to each element to set the correct position. See the code below.
<!DOCTYPE html>
 <html lang="en">
 <head>
 </head>
 <body>
 <span class="social-sprite facebook"></span>
 <span class="social-sprite google"></span>
 <span class="social-sprite twitter"></span>
 </body>
 </html>
We have added three span tags all of the three span tags shares a common class “social-sprite. Now let’s take a look how the CSS code looks like.
<style type="text/css">
 .social-sprite{
 background: url(social-media-sprite.jpg) no-repeat;
 }
 .facebook{
 background-position: 0 0;
 width: 100px;
 height: 100px;
 }
 .google{
 background-position: -100px 0;
 width: 100px;
 height: 100px;
 }
 .twitter{
 background-position: -200px 0;
 width: 100px;
 height: 100px;
 }
 </style>
What you will notice in the above code is that first we have defined a CSS rule to our common class and we added the image as a background image with repeat mode set to no-repeat.
Then, we have defined three rules (one for each unique class) and we have added the width, height and background position.
Width and height are important to define for each unique element because the sprite can different sizes of images combined and we need to make sure any particular element should only display one image at a time.
Defining the background position is what where all the magic happens. Background position is always starts from the top-left corner of the image as in position 0px 0px, where first is the horizontal value and later one is the vertical value. See the background-position code explained below.
- Position
- 0px 0px
- The element will display Facebook’s icon
- 0px -100px
- The element will display Google’s icon
- 0px -200px
- The element will display Twitter’s icon
- 0px 0px
In order to display the correct image, what we are doing is, we are shifting the image back on horizontal axis to only display the visible part. Check the image referenced below.
![]()
Minimize Redirects
What is a redirect?
The term redirect refers to send the user to another page or file URL when they try to visit a particular URL on your website. Let’s say a user visits http://www.domain.com/a and you have redirect setup a redirect to send the user to http://www.domain.com/b, this causes the page load to be slow, because first the user will land on page a and then the redirect will happen taking the user away from page a to page b.
Why there is a need to remove the redirects on your WordPress website?
Tools like Pingdom and GTmetrix shows error explaining the redirects are making the page load to be slow because the redirects adds up few seconds to the process before a page can be loaded.
Redirects cause your pages to load slower because it is a waste of time to go to one place just to be redirected to another and it majorly effect on the mobile devices because of the slow internet connectivity.
Note: There can be reasons to have the redirects if you do SEO etc but keep in mind that redirects cause significant performance and speed issues. Each redirect you remove will make your website load faster.
How to minimize the redirects?
The easiest way to minimize the redirects is to find all the redirects happening on your website. Use Pingdom or GTmetrix free services to identify. Avoid adding http-equiv=”refresh” or any other 301 or 302 redirects if those are not helpful or needed.
Redirects are generally set up either in .htaccess file or in the database with the help of plugins like Simple 301 Redirects, Redirection etc. If the redirects are added in .htaccess file then you can just delete the rule and it will done, but if the redirects are set up in the database, then you need to view the redirects in the WP-Admin and delete it from there (Every redirection plugin comes with an interface to manage the redirects ).
Additional Resources
Content Delivery Network (CDN)
What is CDN?
CDN is short for content delivery network.
A content delivery network or content distribution network (CDN) is a globally distributed network of proxy servers deployed in multiple data centers. The goal is to serve the content to the end-users with high availability and high performance. The closer the CDN server is to the user geographically, the faster the content will be delivered to the user.
CDN nodes are usually deployed in multiple locations, often over multiple backbones. Benefits include reducing bandwidth costs, improving page load times, or increasing global availability of content. Requests for content are typically algorithmically directed to nodes that are optimal in some way. When optimizing for performance, locations that are best for serving content to the user may be chosen.
Why there is a need to enable the CDN on your WordPress website?
Improved Website Speed
It is widely believed that using a CDN will increase the loading speed of your site. Since much of a web page’s load time entails accessing and downloading static components and assets such as images, scripts, and stylesheets, it’s easy to see why a CDN is a key performance boost for your website.
Beneficial for SEO
CDN make the website load faster and faster websites tends to rank high in Google and other search engines.
Cost Saving
Adding a CDN to deliver your website assets is always cheaper than adding additional RAM and CPU on your hosting and this helps especially when you are shared limited hosting plan.
How to enable the CDN on your WordPress website?
First of all you need to identify and select the best CDN for your WordPress website. There are many comparison website available which can aid you in selecting the perfect CDN. One of the best is cdncomparison.com.
Here are some of the recommended resources and ways to enable the CDN on your WordPress website:
WP Emoji
What are Emojis?
Emojis are the ideograms or smileys used in electronic messages and Web pages. Originating in Japan on mobile devices, they are now commonly available on devices worldwide, ranging from mobile to desktop computers.
Different operating systems have distinct methods of accessing emoji. Note that these methods work in most applications, not just WordPress.
Why should you disable the Emoji?
Since version 4.2, WordPress started loading wp-emoji-release.min.js file automatically. If you are not using the Emojis on your website, there is no point having that library load on your WordPress adding one more HTTP call and a resources to be loaded which is of practically no use. If this sound right to you, you can disable the Emoji script from load.
How to remove the Emoji from your WordPress website?
Using WordPress hooks
If you have access to the FTP for your WordPress website. You can add two lines of code in your active theme’s functions.php file to quickly remove the Emoji. Please follow the steps below.
- Connect to FTP
- Navigate to wp-content/themes/{activetheme}
- Open up the functions.php file and add two lines of text added below remove_action(‘wp_head’, ‘print_emoji_detection_script’, 7); remove_action(‘wp_print_styles’, ‘print_emoji_styles’);
- Save the file and reload your website
Using a WordPress plugin
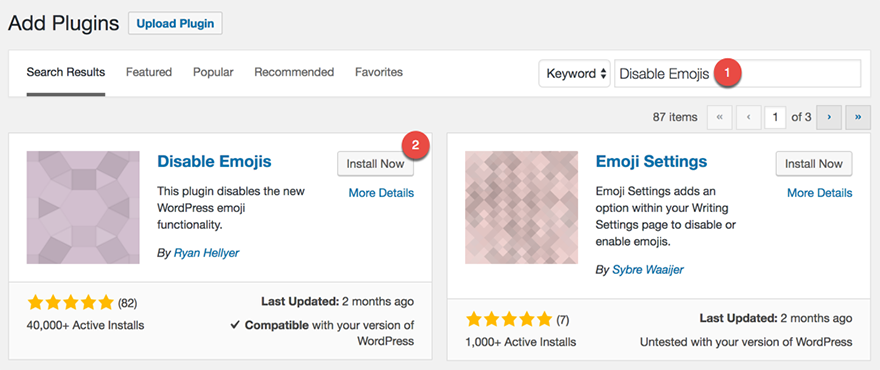
Another easy way to disable the Emoji is to install and activate the plugin Disable Emoji. Please follow the steps mentioned below.
- Log in to WP-Admin
- Navigate to Plugins -> Add New
- Search for Disable Emojis
- Click on Install Now and then click on Activate
- All done
Note: If you have any caching plugin available or you are using managed WordPress hosting like WP Engine, you should clear the cache to have the effect take place.
Which of these WordPress optimization tips are you going to use in 2017?
Wow, you made it all the way to end of this post! Pat yourself on the back. Follow the actionable advice in this guide step-by-step and you will have a lightning fast site, better customer experience and higher rankings. Have a question about any of the tactics shown above or need our team of WordPress web design experts to help? You can contact us here.
Other Great WP Optimization Articles & Resources:
- The Ultimate Guide to Boost WordPress Speed & Performance by WP Beginner
- The Ultimate Mega Guide to Speeding Up WordPress by WPMUDEV
- WordPress Performance Optimization Guide by Securi
- How To Speed Up Your WordPress Site ? A Complete Guide 2017 by Colorlib.com
- 15 Ways to Optimize Speed of Large WordPress Websites by InkThemes
- WordPress Optimization Bible by Vladimir Prelovac
- 18 Tips on How to Speed Up WordPress by KeyCDN
- BONUS: On-Page SEO: Anatomy of a Perfectly Optimized Page by Brian Dean (Our go to guide for on page SEO)
If you know of any other awesome WP resources you think we should include please let us know.