Table of Contents
Schema markup code is what you put on your website to help the search engines return more informative results for users. Depending on the type of information on your website, this could be extremely helpful for your user. Here is one example of a local business that has markup on its event schedule page – the search engine result looks like this;
Schema indexing tells the search engine what the content means so that the most meaningful content can be provided to the user looking for it. For example, if you wanted to identify the Author of a specific article, the Schema tag could identify that the author’s name means something and is not just a collection of random words. This in turn helps with visibly building the authority of the author or brand.
Schema markup was invented and designed for the users – your audience is looking for relevant information related to your company, not fluff. Users looking for reviews, services/products offered, contact information etc., are able to get it in a concise way without having to sift through information all over your site or the web.
Why is Schema important?
If you are looking to get your website to rank better, Schema markup is important. Data markup exists for all kinds of relevant information, here are a few examples
- Articles
- Local business
- Restaurants
- TV Episodes and ratings
- Book reviews
- Movies
- Software applications
- Events
- Products
If you have data on your website, it’s likely to have an associated itemscope and itemtype to help users find your information easier. On average, a website with Schema vs. one without, will rank 4 positions higher in the SERPs. Of course this increase needs to be considered with all other page ranking factors in mind; pagespeed, keywords, etc. just to name a few. Simply put, if you aren’t using Schema markup, you’re missing out on valuable search results and possibly paying leads.

Where do I start with schema tags?
The simplest way that you can add Schema information to your website is using the Structured Data Markup Helper that Google offers. Schema tags works on all search engines and not only Google, the one with the largest market share. We recommend getting this done professionally by an SEO specialist or a web agency like ourselves. While it might be something you can manage to get through, Google is very stringent on their guidelines and how your information should be structured. In addition, you’re losing time and money if the information is not formatted correctly or optimized for SEO.
How do I validate schema tags?
Google has created an online application to review and validate the Schema tags. In order to validate the schema tags on your website, after you added the schema tags on the website, please follow these steps.
- Copy the link of the website
- Visit this URL https://developers.google.com/structured-data/testing-tool/
- Click on Fetch URL link
- Enter the URL in the field and click FETCH & VALIDATE
The tool will fetch the HTML of the page will validate the schema tags and if there were any issues, it will be reported back via red color highlight.
What’s next for my schema?
Schema tags are a powerful way to deliver relevant information to your audience and connect with them on a more engaged level, so take advantage of it! While Schema tags are a great tool to level up your search engine rankings they are only a part of great SEO for your website. To get the most out of your website and start generating real leads we recommend you contact us today for a free consultation. We have over 15 years of experience and have done Schema tag optimization for our clients and for our own website. If you want real results and more revenue, let’s talk today and get your website on the track to ranking higher and working harder! If you would like a step by step guide on how to integrate schema into your website please read the How To Implement Schema Tags On Your Site section below.
Schema types
As we mentioned previously, there are number of different types of schema tags that a website can have. Below we’ve listed out the basic types of schema tags that you can add to your website to start identifying the relevant information for each page and element. In each tag you will see various ‘itemprop’ elements. These itemprop elements are what you need to fill out with the important information related to your website or business.
There are a lot of different elements to schema tags which help Google, and the user, get the information that they need in the best possible way. Here is a list to help you understand exactly how each one works and how it can help your online strategy.
Why should I care about schema?
While schema is not a ranking factor for websites on search engines yet, the effects that it can have on your audience are profound. When you can display relevant information to your audience on the search results page, you can get your users engaged before they even reach your website. Schema tags are sometimes referred to as ‘rich snippets’ and these new chunks of information being shown on a search result are call ‘rich results’. Simply put, if you can give your audience a ‘rich result’ by showcasing the information they need or showcasing 5-star reviews, you are going to win that visitor in most cases over the website that isn’t providing that kind of result.
Google loves schema (and probably will more and more)
Rich snippets from schema tags often result in higher click through rates, and while schema is not hugely popular right now (with only about .30% of domains using schema integration) it will grow in popularity as the results continue to be proven and the database for schema tags grows. There are a number of ‘types’ of schema tags right now to help Google see all kinds of relevant data; if you’re in a niche industry offering key advice you can quickly dominate that search results, not with your rankings, but with your information! Since there is a lot to cover on schema tags, let’s start slow and build up by going over the most common types of schema that you will likely use as a website owner or developer.
Itemscope
Itemscope is the the simplest, but one of the most common schema tags you’ll use. To use this type of schema you simply put it inside a ‘div’ tag; if you don’t know what that is you can check with your website developer who will know. When this itemscope schema tag is placed within a ‘div’ tag, it will tell Google that all of the information within that div. tag is related or about the same topic. This type of schema tag is able to automatically relate the items within the div tag because it is a ‘boolean’ tag which means it doesn’t need a specific value to be assigned to showcase it. Consider this, the itemscope tag, to be the entire scope of the section of html.
Itemtype
Itemtype tags tell a search engine that the content within an HTML tag is about a certain type of item. Unlike the itemscope schema tag, this tag requires a value be assigned to it since it is not a ‘boolean’ tag. This means that each item within a section of HTML will need to have it’s own set of values assigned and defined. You can find a full list of itemtypes on schema’s official website here. To make it easy, we’ve listed out some of the most common itemtype schema tags below for you to easily reference;
Itemprop
The final most common type of schema tag is the Itemprop tag and when used correctly, can be one of the most useful types of schema tags. Once you identify an itemtype schema you will find that each itemtype has several properties which can be defined and the itemprop schema allows you to identify these properties. Let me give you an example; an itemtype could be set to ‘Reviews’ and then the itemprop would identify ‘Review name’, ‘Review text’ ‘Review source’ etc. Google needs to be able to see what ‘type’ of information it is looking at and know the ‘properties’ that are clearly defined for the type of information. Make sense?
It might seem all very complicated at the start, but once you dive into it and get the hang of it, it is really easy to spot itemprops and make the adjustments as necessary. We’ve added in our own modified itemprop so you can compare it to the original schema tag.
<div itemscope itemtype="https://schema.org/LocalBusiness">
    <span itemprop="name">HireAWiz</span>
    <span itemprop='description'>A web design agency based out of Glendale Arizona</span>
    <link itemprop="url" href="www.Hireawiz.com">
    <img itemprop="logo" src="www.hireawiz.com/logo.jpg"/>
</div>
Now that we have seen a basic example of what that schema tag looks like, let’s practically apply a ‘LocalBusiness’ schema tag by copying the one above and making our own;
LocalBusiness: Basics of Schema
<div itemscope itemtype="https://schema.org/LocalBusiness">
    <span itemprop="name">{Business Name}</span>
    <span itemprop='description'>{Description}</span>
    <link itemprop="url" href="{Website URL}">
    <img itemprop="logo" src="{Business Logo URL}"/>
    <link itemprop="sameAs" href="{Google+ Profile}">
    <link itemprop="sameAs" href="{FaceBook Profile}">
    <link itemprop="hasMap" href="{Business Map URL}">
    <a itemprop="telephone" href="tel:{Phone Number}">{Phone Number}</a>

<div itemprop="address" itemscope itemtype="https://schema.org/PostalAddress">
        <span itemprop="streetAddress">{Street Address}</span&lgt;
        <span itemprop="addressLocality">{Locality}</span>
        <span itemprop="addressRegion">{State Abbr}</span>
        <span itemprop="postalCode">{Postal Code}</span>
    </div>

<span itemprop="geo" itemscope itemtype="https://schema.org/GeoCoordinates">
        <meta itemprop="latitude" content="{Latitude}" />
        <meta itemprop="longitude" content="{Longitude}" />
    </span>
</div>
The above helps the search engine in identifying the the business type.
As we discussed before, each itemtype has a specific itemprop to help define the properties of the itemtype. Let’s breakdown each itemprop for the localbusiness itemtype in detail so you can fully understand it. When it’s bunched together in the code it might be hard to sift through, but when the schema tag is pulled apart we can see how each itemprop schema tag shows Google and the user the most important information:
- name:
- The name of your business.
- description:
- A short description of your business.
- url:
- Your website URL.
- logo:
- The logo of your company.
- sameAs:
- You can multiple sameAs properties like your Google+ profile link, your FB page link, your Yelp page link.
- hasMap:
- The URL of the map for your business. In order to get your business map URL, please follow these steps.
- Visit https://maps.google.com.
- Search and locate your business on the map. (You will see your business with all your reviews).
- Click on the Share button.
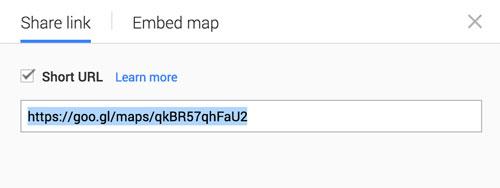
- Click on the Share Link and check the Short URL checkbox (see below)
- Copy the selected text
- The URL of the map for your business. In order to get your business map URL, please follow these steps.
- telephone:
- Add your phone number
- streetAddress:
- Add your business address
- addressLocality:
- City/Town
- addressRegion:
- State abbreviation
- postalCode:
- Postal code
- latitude/longitude:
- These two values can be easily collected from the Google maps website. Please follow the the steps below:
- Visit this link https://google-developers.appspot.com/maps/documentation/utils/geocoder/
- Enter your address in the search box and click Geocode.
- You will see a box below the search field which contains different values. See the below image for the Latitude/Longitude value.
- The location value before the comma (,) is the latitude and the location value after the comma (,) is the longitude.
- These two values can be easily collected from the Google maps website. Please follow the the steps below:
Let’s Add a Review section
One thing that is really valuable for your business is social proof and by adding social proof to your ‘rich snippets’ a user can see immediately your reviews, even for specific services. Social proof demonstrates to your audience and prospective customer that you are an expert and that you have the experience that they would be looking for. Reviews are a great way to showcase this when someone searches for your business and schema tags can bring the reviews right to the top of your Google searches! Remember how we talked about the ‘richer results’? This is a great example of that.
Just like in the previous section, the text within the itemprop will provide you with the title of the section and is followed by the ‘body’ of the section. In this case, for example, itemprop “reviewBody” is where the actual review that a customer gave your business would go. This means that when someone searches for your business, your reviews would be indexed by Google and show up right away for people to see and review. It’s a powerful way to get your information in front of the audience before anyone else (and you don’t even have to rank higher than them to do it!) Let’s look at another example of the itemtype for Reviews and then the itemprops for the schema tag;
Reviews itemtype
<div itemscope itemtype="https://schema.org/Review" itemprop="review">
    <div itemprop="reviewBody">{Review text}</div>
    <div itemprop="reviewRating" itemscope itemtype="https://schema.org/Rating">
        <span itemprop="ratingValue">5</span> /
        <span itemprop="bestRating">5</span>
    </div>
    <span itemprop="author" itemscope itemtype="https://schema.org/Person">
        <span itemprop="name">{Person/Reviewer Name}</span>
    </span>
    <div itemprop="itemReviewed" itemscope itemtype="https://schema.org/Thing">
        <span itemprop="name">{Company Name}</span>
    </div>
</div>
Now, let’s look at the itemprops for the Reviews itemtype
- reviewBody:
- Review text provided by a person/company.
- ratingValue:
- This should be the value provided for the particular review.
- bestRating:
- The maximum value of the rating.
- author -> name:
- Name of the person/company who reviewed.
- itemReviewed -> name:
- Name of your company/business
As you can, the format is almost identical to the LocalBusiness schema tag with some minor adjustments based on the needs of the content. We will go through one final example for the Breadcrumbs schema just to make sure you got it 100%.
Adding a breadcrumb requires a little extra effort but helps the search engine find your website in a great way. You will notice that there are 3 “LI” elements, or List Item elements, in the below example. There can be more or less depending on the page hierarchy for which you want to enable the breadcrumbs schema. Here is how you should use them;
- The first “LI” element will always point to the home and contains home URL so keep that in mind.
- The last “LI” element should never contain a link.
Breadcrumbs itemtype
<nav role="navigation" aria-label="Breadcrumbs" itemprop="breadcrumb">
    <ul itemscope itemtype="http://schema.org/BreadcrumbList">
        <meta name="numberOfItems" content="{Total number of items in hierarchy}" />
        <meta name="itemListOrder" content="Ascending" />
        <li itemprop="itemListElement" itemscope itemtype="http://schema.org/ListItem">
            <a href="{Home URL}" rel="home">
                <span itemprop="name">Home</span<
            </a>
            <meta itemprop="position" content="1" />
        </li>
        <li itemprop="itemListElement" itemscope itemtype="http://schema.org/ListItem">
            <a href="{2nd level URL in hierarchy}">
                <span itemprop="name">{Page name}</span>
            </a>
            <meta itemprop="position" content="2" />
        </li>
        <li itemprop="itemListElement" itemscope itemtype="http://schema.org/ListItem">
            <span itemprop="name">{3rd level URL in hierarchy}</span>
            <meta itemprop="position" content="3" />
        </li>
    </ul>
</nav>
Now let’s look at the breakdown of the itemprops themselves for this itemtype.
- numberOfItems:
- The total number of items in the breadcrumb for current page.
- itemListOrder
- This should be always be Ascending.
- itemListElement:
- We need to this itemprop multiple times (total element in the hierarchy).
- position:
- The position of the element in the hierarchy, starting from 1 in the incremental order.
- name:
- Title of the page (If it’s not the last element, then this property should be wrap in the anchor tag with the link of the page in the href).
- position:
- We need to this itemprop multiple times (total element in the hierarchy).
So why don’t more people use schema tags?
That’s a great question with a pretty simple answer; it seems scary and it looks like it will take time. Both are kind of true, but you don’t need to be a developer or website expert to start incorporating schema tag markup, and missing out on using it could be costing you traffic if you’re not already #1 in the SERPs. The simplest way to get going is just to start doing it! Practice might not make perfect but it makes progress. So with all of that being said, what options do you have for adding schema to your website?
Option 1: Get a plugin that works
If you have a WordPress based website you can start by getting a schema tag plugin that will help you get your schema going. To get a quality one you will probably end up spending a few bucks, but you will see that return in no time if you can convert traffic to your website. Here is a list of some of the Schema Tag plugins that are available for helping you generate rich snippets for your website.
The Rich Snippets Plugin for WordPress is only $12 and lets you get your rich snippets, or structured data (or schema tags), setup in no time with an easy and user friendly interface. All you have to do is;
- Set up your own rich snippets code or just edit the pre-installed ones
- Define the HTML-Markup that you need for the microdata (note that no PHP programming skills are needed but PHP can be used if you want to do some special things)
- Save your settings and use the generated shortcode in your posts, pages or custom post types.
Boom, you’ve gotten your feet wet with schema tags without pulling out your hair over coding. Again, there are some limitations with this option and different plugins will offer different levels of flexibility, but as you become more familiar with schema and understand your needs, you can make those changes.
Option 2: The Google way
This might be our favorite way, and it makes sense that Google would have one of the better free tools to use since they are the leading search engine on the web. Their schema tag markup tool is easy to use and will allow you to identify itemtypes and itemprops for your structured data.
Stepbystep how-to
- Visit Google’s schema data generator https://www.google.com/webmasters/markup-helper/u/0/
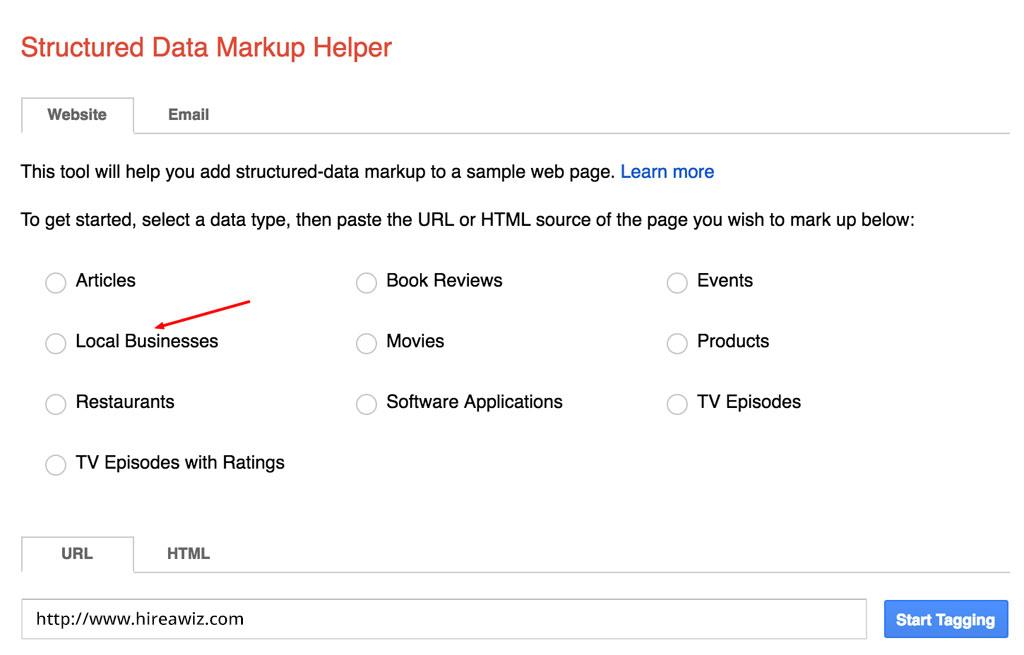
- Select the preferred data type and enter the URL of the website for which you want to generate the schema data. See the figure below.
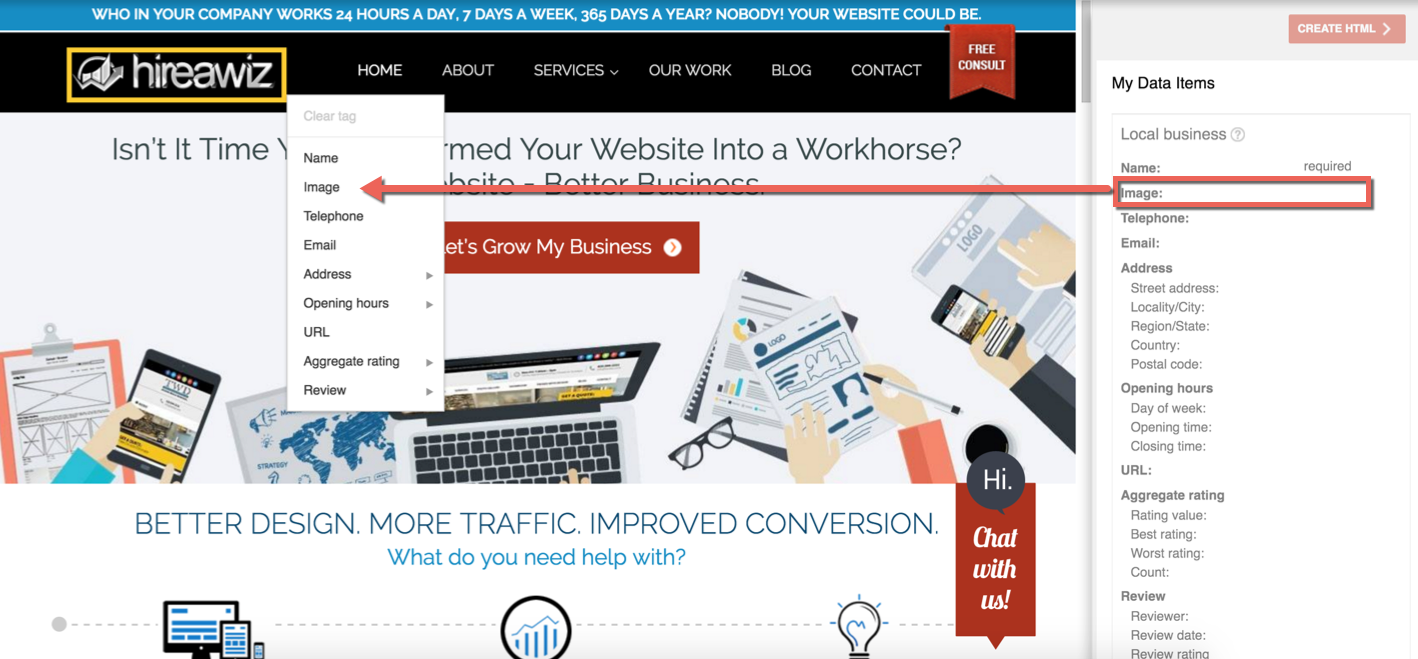
- The website will be opened in a new window with a sidebar on right hand side having different schema properties. See the figure below.
- Click or select any element/text on the page and then select the necessary tag applicable from the dropdown. As you tag the information, the data will be auto populated in the sidebar for the respected tag.
- Keep highlighting and adding as many properties as you can and want. Once you’re done, move on to the final step by clicking the red “create HTML” button in the top right. This will generate the new HTML for your page including what you had before plus the new schema markup.
- The final step is to implement the generated schema on the website. Generating the schema markup is easy but adding the same schema into the website is a little tricky. Adding schema markup depends on the website platform.
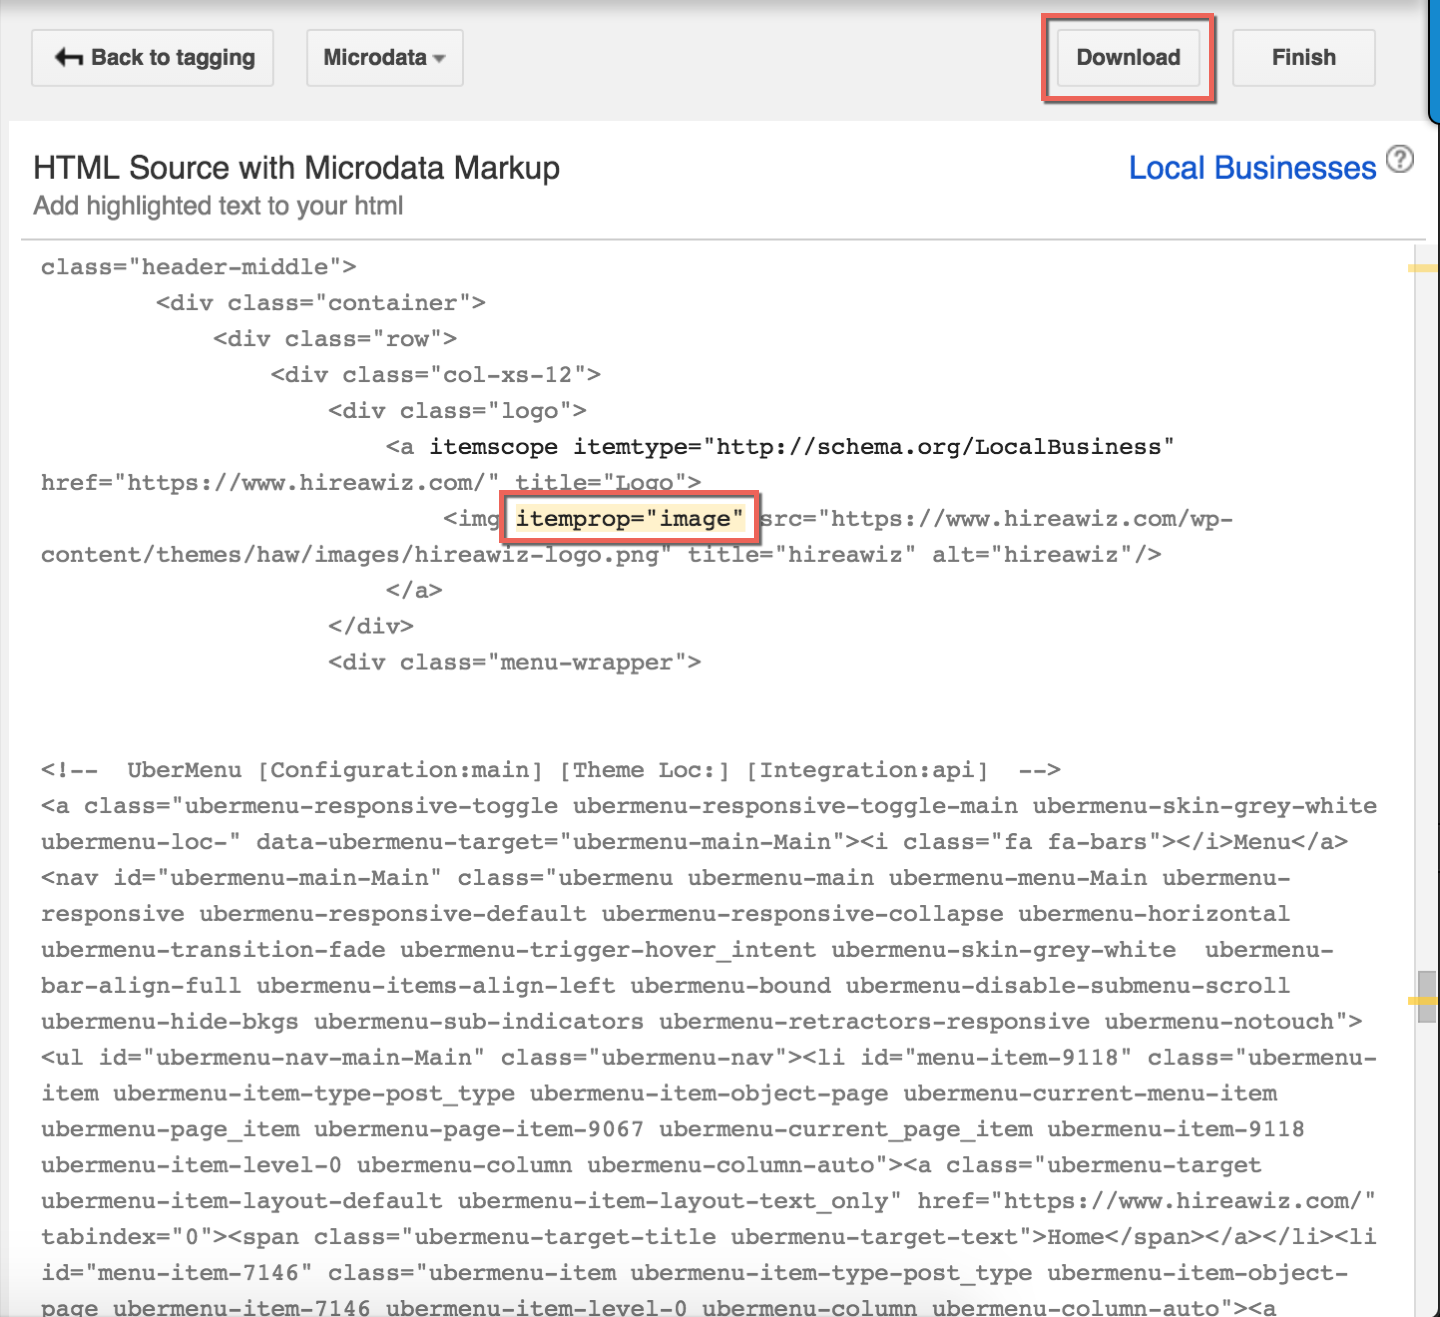
a. If you are using a CMS where you can update the static HTML directly, then you can just click on the download button as highlighted in the next figure.
b. If you you are using a CMS like WordPress, in that case the changes need to made manually in the HTML. You will notice the changes implemented by the markup tool in yellow color. Copy those changes and manually add those changes into the webpage.
- When you are done adding the schema markup on the website you can validate the schema on the Google tool called Structured Data Testing Tool.
Option 3: Skip the tools
If you’re a web developer/website expert, do it yourself! The two tools above are great for beginners or intermediate users but they are limited in some ways. Setting up the itemtypes and itemprops yourself for your structured data allows you to be as specific and pinpointed as you want to be with every area of your website.
In our blog we have already shown you exactly how to do this, check it out;
- LocalBusiness
- Reviews
- Breadcrumbs
Schema tags aren’t as complex or scary as you might think when you do them the right way, and when implemented can have a great and lasting impact for your business’ online presence. To get the most out of your website and start generating real leads we recommend you contact us today for a free consultation Our web development team has been using technology to help small businesses since 2001. Find out more about what makes us the best choice for developing your site by calling us today at (623) 521-1418!
Our list of Helpful Links and Tools *Added bonus
- The BEST Schema Tag Tools
- Google’s Structured Data Markup Helper
This tool will help you create basic Schema markup for several use cases. Check out our detailed breakdown of how to use this tool to start marking up your website and data in no time. - Mozbar
Double-check your structured data markup and redirects with this toolbar from Moz, a leader in SEO marketing: If Moz is finding ways to use schema you can be confident the industry will follow. - Structured Data Testing Tool – Google
Use this tool to test whether your rich snippets are properly configured. Rich snippets aren’t guaranteed to show up in Google but if you configure them the right way and check with the right tools, you increase your chances greatly!
- Google’s Structured Data Markup Helper
- Some Extra Resources (These are on the house!)
- Bing Guide to Marking Up Your Site
Bing’s information resource center, describing how they support structured data and what they look for. Google is a titan in online searches, but missing out on platforms like Bing could cost you, so understand how to accommodate their requirements. - Schema.org
The official site. Here you can find the latest updates, a guide to implementing Schema, and FAQs. Keep in mind that this is an industry standard website – if a change happens with schema, you will find it here first. - Rich Snippets: Everything You Need to Know
BuiltVisible’s guide to generating rich snippets.
- Bing Guide to Marking Up Your Site


